This tutorial assumes you've already launched Pegasus Mail.
1) To configure a POP email account with SSL, first click the "Tools" tab.
2) Then click "Internet Options".
3) The easiest way to setup your email account is to start the Setup Wizard... click here.
4) Then click "Next".
5) Enter your email address you wish to configure here, then click "Next" again.
6) Enter your incoming POP3 server address here, then click "Next".
7) Enter your full email address as the username, and your email account's password.
8) Then click "Next".
9) Enter your outgoing server address here, then click "Next".
10) Ensure the "Network or Broadband" option is selected, then click "Next".
11) Click "Finish".
12) Now click the "Receiving (POP3)" tab here.
13) Select the POP3 host we just setup, then click "Edit".
14) Now click the "Security" tab.
15) Click here to require a secure SSL connection for the incoming server.
16) Then click "Change" so the port numbers are automatically adjusted.
17) Click the "General" tab.
Note that the port number has been updated to 995, the standard port number for SSL.
18) Click "OK".
19) Next click the "Sending (SMTP)" tab here.
20) Select the SMTP host we just setup, then click "Edit".
21) Now click the "Security" tab.
22) Click here to setup SMTP authentication using your POP3 username and password.
23) Then click this "Select" button.
24) Choose your POP3 definition (the one you just setup), then click "Select".
25) Click here to require a secure SSL connection for the outgoing server.
26) Then click "Change" so the port numbers are automatically adjusted.
27) Click the "General" tab.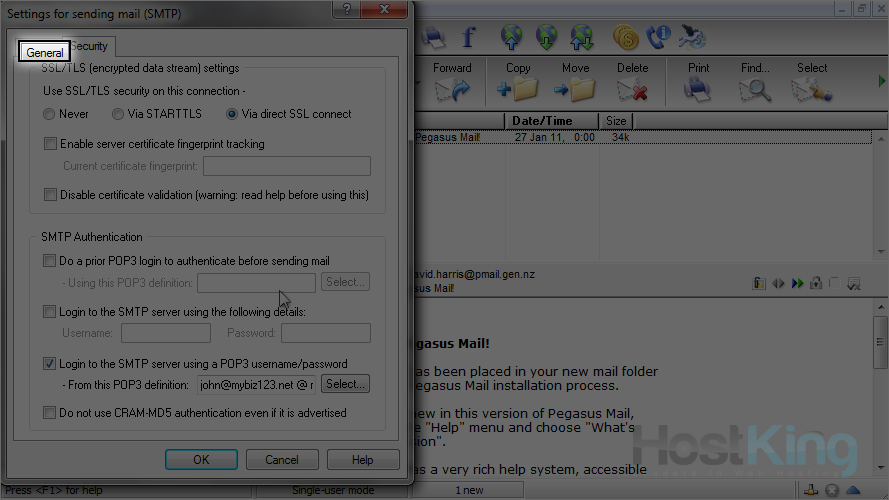
28) Click "OK".
Note that the port number has been updated to 465, the standard port number for SMTP SSL.
29) Click "OK" again.
That's it! The email account has been added.
This is the end of the tutorial. You now know how to configure a POP email account with SSL in Pegasus Mail.
