This guide is to assist in migrating a website from another service provider to Hostking.
Background
Migrating, transferring or moving a WordPress installation from your current provider to a new service provider can be a difficult process for newbies. There are many things that you need to consider during the migration process. For example, you need to export and import SQL files, copy and paste the WordPress folder into your FTP, find and replace links and much more. With this tutorial, you are going to find the whole process seamless. Let’s get started.
Information Required
You need the following pieces of information before you proceed with this tutorial. The information required is:
- Hostname (e.g. yourwebsite.com)
- cPanel Username
- cPanel Password
- FTP Username
- FTP Password
Exporting the SQL file
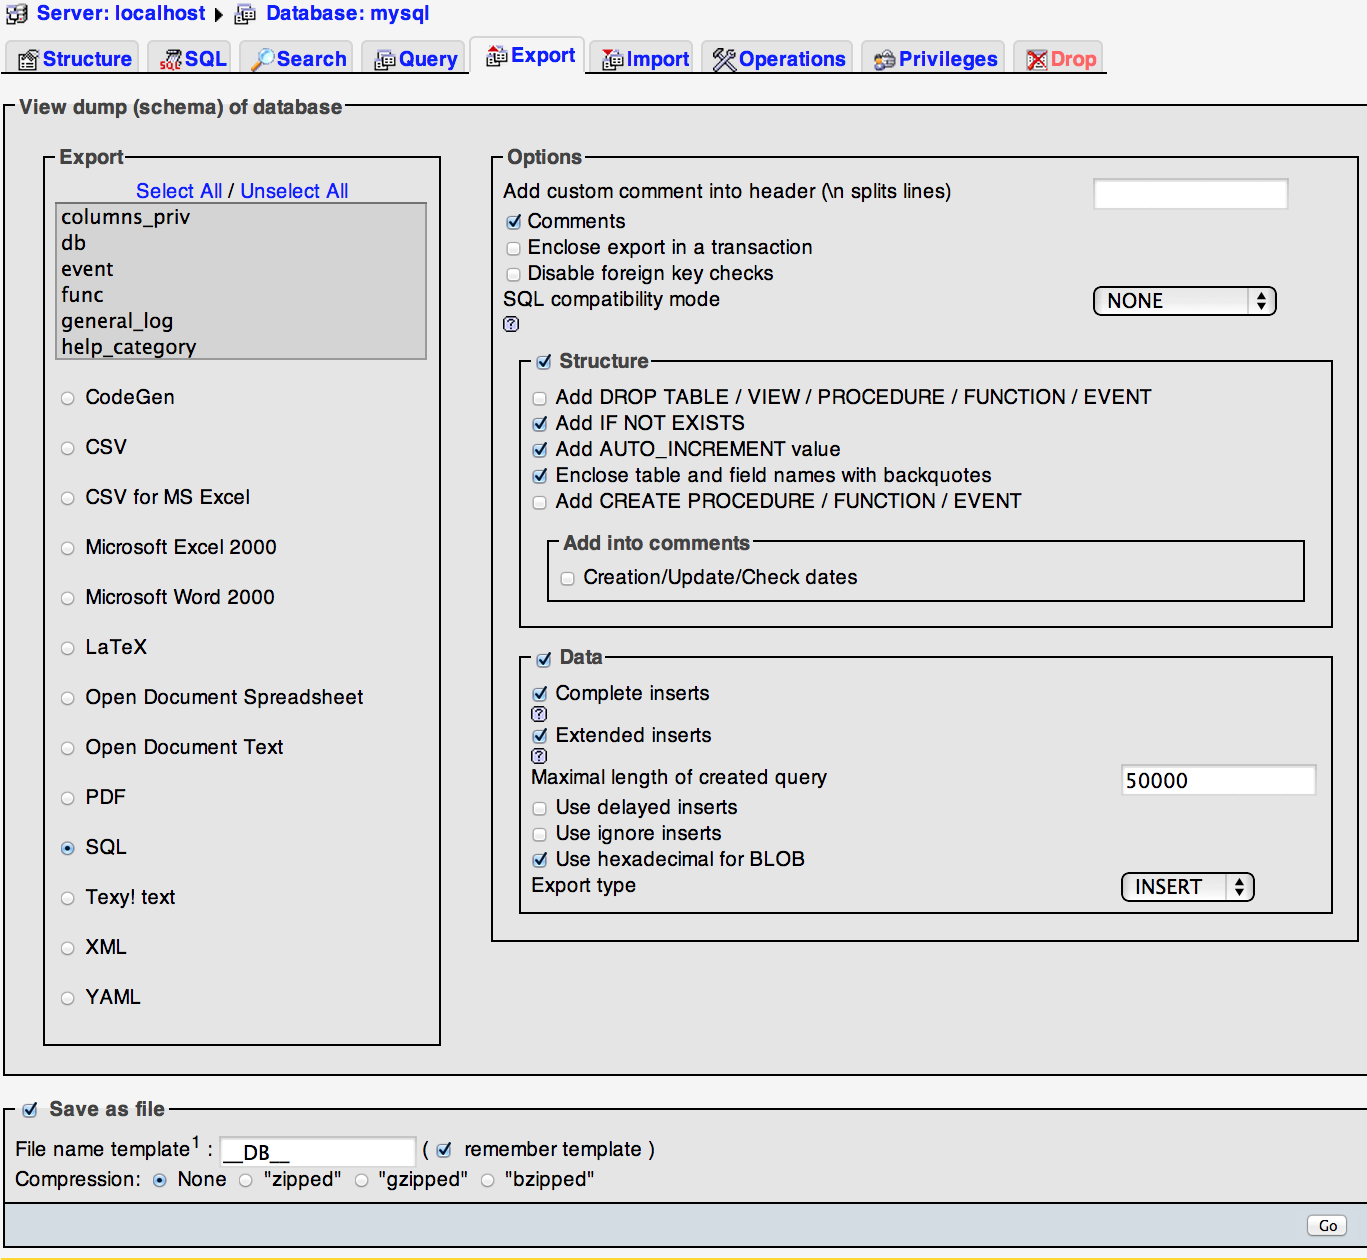
At first, you need to export the WordPress SQL file from the phpMyAdmin via your current provider's control panel. You will find this within the database section of their control panel. Click phpMyAdmin. Now, once you are inside phpMyAdmin, click the WordPress database that you would have created earlier. Once that’s done, click the Export tab. See the image below to ensure the settings are perfectly fine. Then, simply click the Go button on the bottom right corner of the page to download the automatically generated .SQL file. Store it on your Desktop for now.
Creating the Database on Hostking Server
We provide you with a system called cPanel for Linux Hosting or WebsitePanel for Windows Hosting that allows you manage your hosting account. Log in to your website’s cPanel by going to http://yourwebsite:2082 and click the MySQL Database Wizard. Create your fresh WordPress database by adding in the required Database name, username, password. You will be needing this information at a later stage. This step should be a breeze as it hardly takes less than 2 minutes to complete.
Importing the SQL file
To import your SQL file (the one you stored on the desktop before and modified using FileZilla or favourite FTP Program), go to your cPanel again and click the phpMyAdmin link by scrolling down a little. Once clicked, you would be taken to the phpMyAdmin on the web server (yes, it looks like the same as your previous host). On the left hand side, you would be presented with a list of all the databases on your hosting account. Click the database you created for WordPress earlier and then click the Import tab. Now, you would be taken to the Import section where you can import the SQL file. To do that, click the “Choose File” button and select the SQL file from your desktop (or wherever you stored it). Once done, click the grey “Go” button below. If all goes well, you would be presented with a green success message saying the SQL import was successful. Voila.
Copying the WordPress website to your Desktop
Create a folder on your desktop to store your website files. To do that, you would need to download a copy all your website files even folders from your previous host via FTP. The FTP gives you access to your web server’s folder where keeping anything there makes it available to the general public. Using your favorite FTP client (we recommend FileZilla), login into your web server’s FTP account by using the following information: hostname like yourwebsite.com, username and password. You might already have the account information, so it shouldn’t be a problem whatsoever.
Copying the WordPress Folder to FTP
Copy the folder and files within your Desktop folder you created, as it is, into your public_html. This would make your website accessible at http://yourwebsite.com/. Once that’s done, proceed to the next step. Ignore the error if any displayed.
Connecting your WordPress with the Database
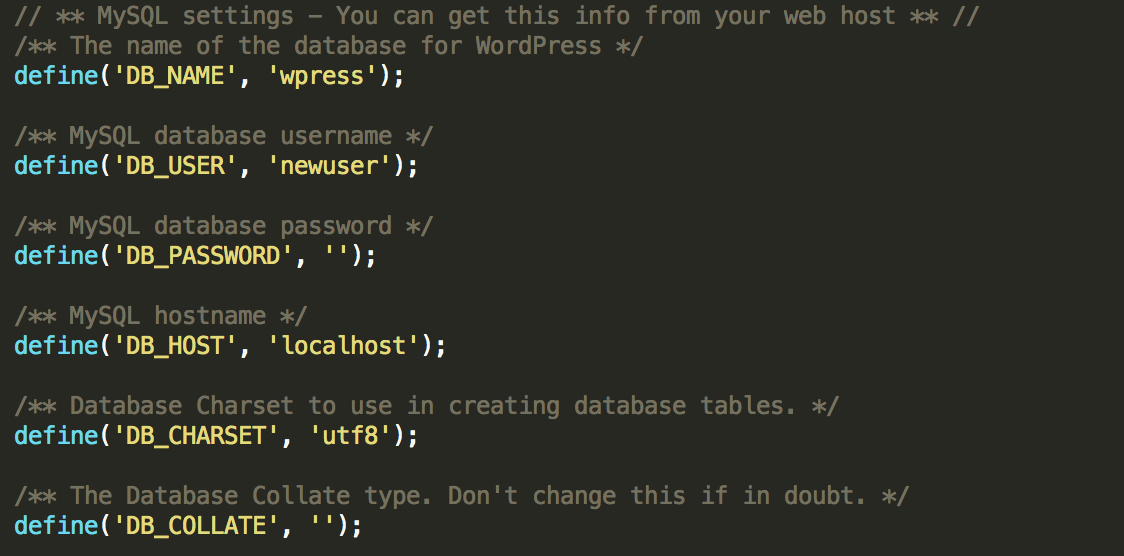
You still need to connect your WordPress with your database so it can communicate. At this point in time, your WordPress’s configuration is still set to the settings of your previous provider, and that needs to be changed. To do this, go into your WordPress’s root folder inside your web server (public_html) and edit the file wp-config.php. This would allow you to update 3 key pieces of information, namely: DB_NAME, DB_USER, DB_PASSWORD. You might have these 3 pieces of information already from the earlier exercise where you were asked to create a database on your web server using cPanel. Here’s a much needed visual. You just need to update the top 3 lines, only. Leave the rest as it is. Save the wp-config.php file again (overwrite it).
Accessing your WordPress Dashboard
Now, hoping you did everything right as shown in this tutorial, you should be able to access your WordPress site. It will be exactly the same thing as it was on a localhost, but the only difference here is that your site is now migrated to a Hostking web server. To access your WordPress site, go to http://yourwebsite.com. If your site looks the same as it was at your previous provider, you’ve done a marvelous job and kudos to you for that. Now, let’s access the dashboard by going to http://yourwebsite.com/wp-admin. Plug in your username and password and if the dashboard shows up without any glitches, the job is well done!


